You may already have an idea for your next water bottle.
Maybe you have sketched a unique bottle shape, designed a custom lid, or created a complete 3D drawing. The next question is often: Can this design actually be manufactured as a vacuum insulated water bottle?
Designing a vacuum insulated bottle is different from designing a regular container. The inner and outer walls, vacuum space, material thickness, neck structure, threads, sealing system, lid and manufacturing tolerances all need to work together.
A vacuum insulated water bottle may look simple from the outside, but its thermal performance, leakproof performance and durability depend heavily on how the internal structure is designed.
Whether you already have a 3D CAD drawing, a simple sketch, or just an idea for a new bottle, understanding these design considerations can help you avoid costly changes later in the development process.
This guide explains the key design considerations you should understand before turning your concept or drawing into a production-ready vacuum insulated water bottle.
1. Design the Space Between the Inner and Outer Walls
The first thing to consider when designing a vacuum insulated water bottle is the space between the inner and outer walls.
This space is not simply an empty gap. Its dimensions have a direct relationship with the bottle’s structure, manufacturing process and thermal performance.
How Much Space Should Be Between the Two Walls?
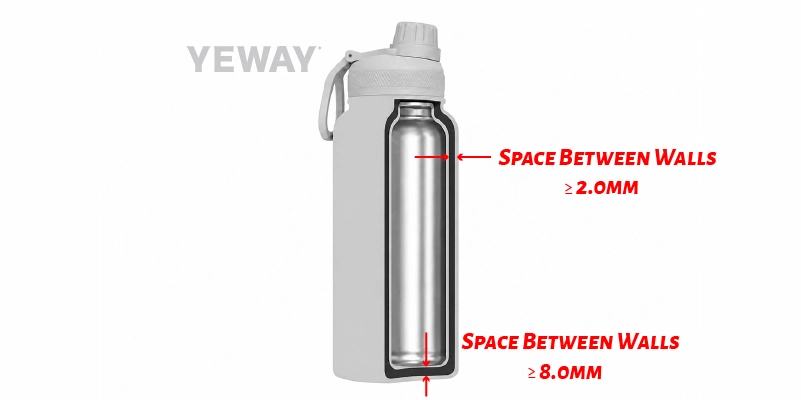
The distance between the inner wall and the outer wall is usually 3mm, and the minimum is 2mm. There must be a vacuum layer with enough space to achieve the thermal insulation effect;The exact gap may vary depending on the bottle diameter, wall thickness, shape and manufacturing process.
Space at bottle bottom
The bottom structure often requires more space than the straight body section.The distance between the inner and outer walls of the vacuum layer at the bottom of the vacuum flask is usually 10mm, and the minimum is not less than ≥8mm. If the distance between the bottom vacuum layer is too small, after vacuuming, under the action of air pressure, the bottom of the outer wall will deform and then touch To the bottom of the inner wall.
The Key Principle
A good vacuum bottle design does not simply maximize the space between the two walls.
It aims to maintain an appropriate and stable vacuum gap while balancing:
Thermal performance + structural stability + bottle dimensions + manufacturability
2. Choose the Right Inner and Outer Wall Thickness
When the diameter of the insulated water bottle is less than 70mm, stainless steel with a thickness of 0.4mm is usually used; For the diameter of the insulated water bottle larger than 70mm, stainless steel with a thickness of 0.5mm, 0.6mm, or 0.7mm is used according to actual needs.
Why Not Simply Use Thicker Stainless Steel?
The thicker the stainless steel, the more durable, but the higher the cost.
For example, increasing the wall thickness from 0.4 mm to 0.6 mm may improve structural robustness, but the additional material can affect:
- Bottle weight
- Material cost
- Forming force
- Welding parameters
- Product positioning
For a lightweight bottle, designers may want to minimize material usage. For a large-diameter or heavy-duty outdoor sports bottle, greater wall thickness may be appropriate.
Inner Wall vs. Outer Wall
The inner and outer walls do not necessarily have exactly the same structural requirements.
The inner wall needs to contain the beverage and maintain its shape inside the vacuum structure.
The outer wall needs to maintain the exterior geometry and withstand handling and external impact.
Therefore, wall thickness should be selected according to the complete bottle structure rather than using a single number for every project.
A Useful Design Balance
Think of wall thickness as a balance:
Too thin → lower structural margin and greater forming sensitivity
Too thick → higher weight, material usage and cost
The right thickness is the one that provides sufficient strength and manufacturability without adding unnecessary material.
3. Design the Shape: Why Are Vacuum Flasks Usually Round?
Look at most vacuum insulated bottles on the market and you will notice something immediately:
The majority are round or cylindrical.
This is not simply a matter of appearance.
The cylindrical shape works particularly well with a double-wall vacuum structure.
Why Is a Cylindrical Shape So Common?
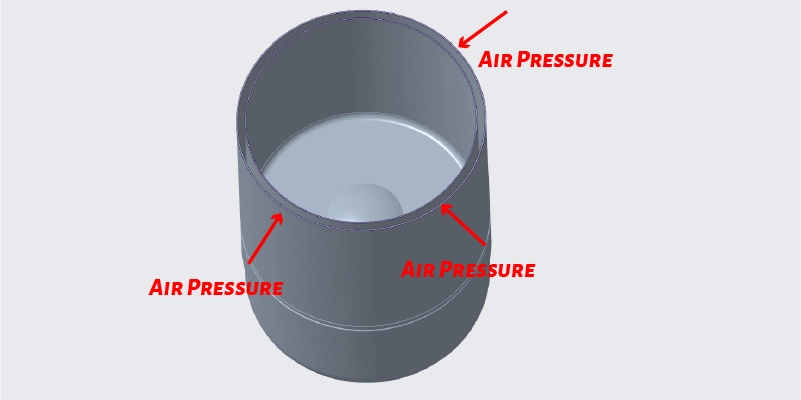
After vacuuming the space between inner and outer walls of the thermos cup, every point of the thermos cup bears even and huge air pressure. In this case, the circular structure is the most stable and performs best. This principle is equivalent to the arch bridge built in ancient times. Those arch bridges have not collapsed for hundreds of years without reinforced concrete, which is the use of the mechanical structure characteristics of arch bridges.
Can You Make a Square Vacuum Bottle?
Yes.
A vacuum insulated bottle does not have to be perfectly cylindrical.
It can be:
- Square
- Rectangular
- Oval
- Flattened
- Triangular
- Sculpted
- Custom-shaped
However, the more the shape moves away from a smooth cylindrical geometry, the more complicated the internal structure becomes.
Why Are Square and Irregular Shapes More Difficult?
Consider a square bottle with four relatively flat sides and sharp corners.
The inner and outer walls need to follow the same basic geometry while maintaining enough clearance for the vacuum layer.
The corners can create several challenges:
- Uneven vacuum gaps
- Local stress concentration
- Forming difficulty
- Greater risk of deformation
- More complicated tooling
- More difficult dimensional control
A highly customized shape may therefore look excellent in a 3D model but require significant engineering adjustment before it can become a reliable vacuum bottle.
Flat Sides Are Possible
A useful compromise is often to introduce flatter surfaces while maintaining rounded transitions.
For example, a bottle can have:
- Two or more flat gripping areas
- An oval body
- Rounded rectangular geometry
- Softly sculpted sides
These shapes can create a distinctive appearance while remaining more compatible with vacuum construction.
The key is to avoid treating the exterior shape as independent from the inner vessel.
The more complex the outside shape becomes, the more carefully the inside structure needs to be designed.
4. Thread design
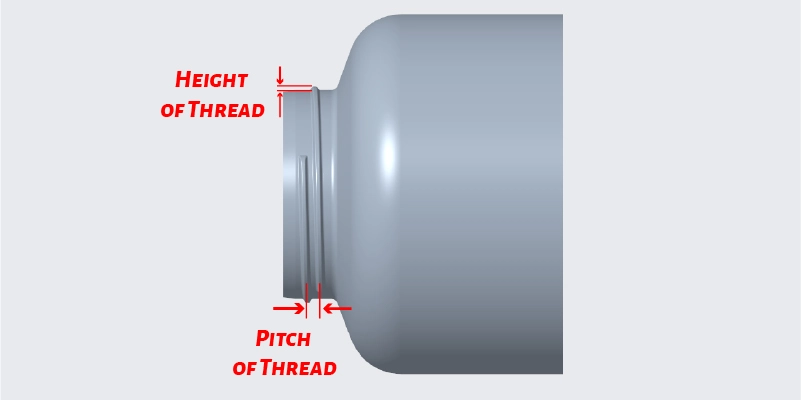
Because the threads on the stainless steel water bottle are made by roll threading, not by turning. Therefore, thread with small pitch or large height cannot be applied.
When designing the thread on the vacuum thermos flask, the designer needs to pay attention that:
Height of thread: The height of thread cannot greater than 1.2 mm. It is reasonable for the thread height to be between 1.0-1.2mm. Thread height lower than 0.9mm will cause slippage.
Regarding the thread design on the lid, the height of the thread must be less than 1.4mm.
Pitch of thread: The lower limit of the pitch is 3mm. The pitch of thread on the insulation bottles is usually between 4mm-5mm. When the pitch is less than 3mm, the defect rate in the production process will be very high, and the reliability of the product will be reduced, and the life of the thread will be shortened.
Thread Engagement
Thread engagement needs to be sufficient to provide:
- Secure lid attachment
- Reliable sealing
- Good user experience
- Resistance to cross-threading
- Long-term durability
Too little engagement can reduce reliability.
Too much thread engagement can increase closing effort and complicate the design.
Design the Neck and Lid Together
One of the most important principles in vacuum bottle design is:
The bottle neck and lid should be designed as one system.
Changing the neck diameter, thread or sealing surface can require corresponding changes to the lid and gasket.
5. Choose the Right Metal Material
Material selection is another fundamental part of vacuum bottle design.
Stainless steel is widely used because it combines corrosion resistance, durability, formability and suitability for reusable food and beverage containers.
304 Stainless Steel
304 stainless steel, often described as 18/8 stainless steel, is widely used in stainless steel drinkware.
It offers a practical combination of:
- Corrosion resistance
- Durability
- Formability
- Food-contact suitability
- Cost efficiency
For many everyday vacuum insulated bottles, 304 is a practical material choice.
316 Stainless Steel
316 stainless steel contains molybdenum and generally provides higher resistance to certain corrosive environments than 304.
It may be considered for products where enhanced corrosion resistance is an important requirement.
However, 316 is not automatically the better choice for every water bottle.
The correct material depends on:
- Target application
- Required corrosion resistance
- Regulatory requirements
- Product positioning
- Cost target
- Manufacturing process
Material Is More Than a Grade Number
When designing a vacuum bottle, material selection should also consider:
- Sheet or tube form
- Material thickness
- Forming characteristics
- Welding behavior
- Surface requirements
- Food-contact compliance
The best material is therefore not simply the most expensive material.
It is the material that provides the required performance for the intended product.
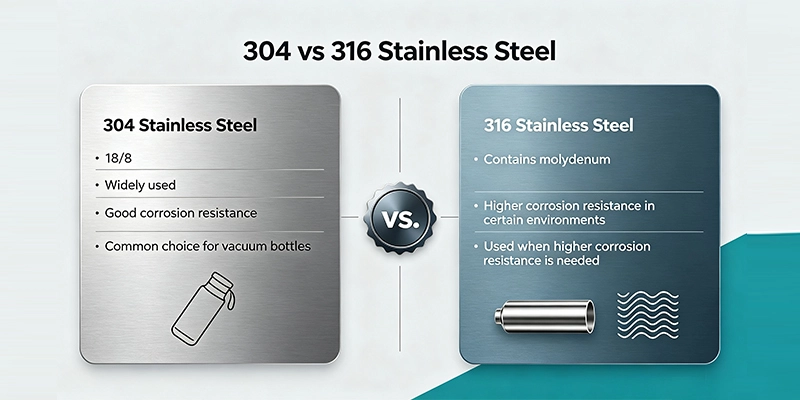
If you are comparing different stainless steel grades, our guide to 304 vs. 316 stainless steel can help you understand the differences.
6. Choose the Lid Structure and Plastic Material
The Lid Is Also Part of the Thermal System
A highly insulated bottle body can still lose heat through the neck and lid.
Different lid structures also affect sealing, usability, cleaning and manufacturing complexity. For a deeper look at the main water bottle lid types, see our complete guide to stainless steel bottle lids.
This is particularly important for lids containing:
- Large openings
- Metal components
- Straw channels
- Valves
- Thin plastic sections
Therefore, lid structure and material should be considered together with the bottle’s insulation requirements.For custom projects, the lid also needs to be developed together with the bottle neck, sealing system and overall bottle structure. You can learn more about our OEM & ODM water bottle manufacturing capabilities here.
Most of the lid materials are PP, Tritan and AS, all of which are BPA free.
Material selection can affect:
- Heat resistance
- Impact resistance
- Stiffness
- Weight
- Transparency
- Chemical resistance
- Long-term durability
For example, a transparent lid component may require different material considerations from an opaque structural lid component.
The material should therefore be selected according to the function of each part rather than simply choosing one plastic for the entire lid.
7. Design of silicone seal gasket
Generally, there are two types of sealing design, side sealing and top sealing. Side sealing is usually used for pressed-in lids (such as tumbler lids). Top sealing is as cola shaped bottle lid.
Normally, the thickness of the silicone silicon ring on the side sealing is 1mm; The thickness of the silicone ring for top sealing is 2-3mm.
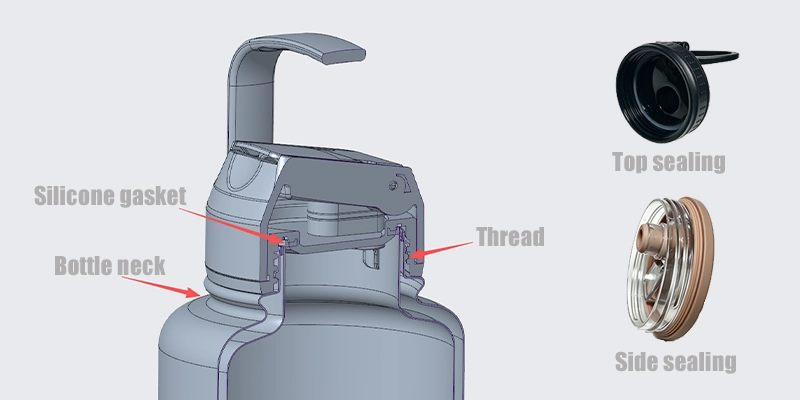
Top Seal vs. Side Seal
Different lid designs can seal in different ways.
A gasket may seal:
- Against the top of the bottle neck
- Around the outside of the neck
- Against an internal sealing surface
- Through a combination of multiple sealing points
The best configuration depends on the lid architecture.
A Leakproof Bottle Is Not Created by the Silicone Ring Alone
This is an important point for anyone designing a custom bottle.
A gasket cannot compensate for a poorly designed thread, uneven sealing surface or excessive dimensional variation.
The sealing system must be designed as a complete mechanical system, not as a silicone component added at the end.
8. Design the Vacuuming Point
The vacuuming point is usually located at the center of the bottom of a vacuum insulated water bottle. Before the vacuuming process, a small hole is made in the center of the outer bottom wall, allowing the air inside the space between the inner and outer walls to be evacuated through this opening. This opening is known as the vacuuming point.
Placing the vacuuming point at the center of the bottom has little to no impact on the overall appearance of the bottle, as it can be sealed after the vacuuming process. More importantly, the central position helps distribute the pressure more evenly across the bottom structure during evacuation. This reduces the risk of localized deformation caused by uneven pressure and helps maintain the structural integrity of the bottle.
9. Common Vacuum Flask Design Mistakes
Most vacuum bottle design problems can be traced back to a small number of structural mistakes.
Mistake 1: Designing Only the Exterior
A bottle may look excellent from the outside but still be difficult to manufacture.
The internal wall spacing, wall thickness, neck structure and bottom construction need to support the exterior design.
Mistake 2: Using the Same Vacuum Gap Everywhere
The body and bottom do not necessarily require the same geometry.
Trying to apply one clearance value to every part of the bottle can create structural problems.
Mistake 3: Making the Walls Too Thin
Reducing wall thickness can save weight and material, but excessive reduction can make forming, welding and dimensional control more difficult.
Mistake 4: Making the Bottle Shape Too Complex
Sharp corners, deep recesses and highly irregular geometry can make it difficult to maintain a consistent vacuum chamber.
Mistake 5: Designing the Bottle Neck Without the Lid
The neck, thread, gasket and lid must be designed together.
A change to one component can affect all the others.
Mistake 6: Treating the Gasket as the Entire Sealing System
The gasket is important, but sealing performance also depends on thread engagement, sealing surfaces and tolerances.
Mistake 7: Ignoring Heat Transfer Through the Neck
The main bottle body may have an effective vacuum layer, but the neck and lid can still create significant thermal bridges.
Mistake 8: Choosing Materials Based Only on Cost
The cheapest material may not provide the required strength, corrosion resistance or forming performance.
Mistake 9: Skipping Prototype Testing
A CAD model can verify dimensions and geometry, but it cannot fully replace physical testing.
The prototype should be used to verify the actual structure, sealing, usability and thermal performance before mass production.
10. How to Design a Vacuum Flask for Better Thermal Insulation
The previous sections have covered the individual design factors that affect insulation performance.
The important thing to understand is that thermal insulation does not come from one single feature.
A good vacuum insulated stainless steel water bottle combines several structural decisions:
- Reduce the diameter of the bottle mouth. A smaller opening helps minimize heat transfer through the neck and mouth area.
- Use a stopper or suitable insulating component. This can help reduce heat conduction through the bottle mouth and neck.
- Add a copper layer to the outside of the inner wall. Copper has high thermal conductivity and can help reflect radiant heat within the vacuum structure, improving overall insulation performance. Click here to learn more about the copper plating process.
- Add an aluminum foil layer around the outside of the inner wall. This can further reduce heat transfer, but it also increases manufacturing cost and requires additional space inside the vacuum structure. As a result, the overall diameter of the bottle may need to be increased.
- Consider increasing the bottle capacity. When comparing vacuum flasks with similar designs, a larger-capacity bottle generally experiences slower temperature changes because it has a lower surface-area-to-volume ratio. In other words, the larger the volume, the longer the contents may retain their temperature under otherwise similar conditions.
11. How Your Design Affects Development Cost
Two vacuum bottles with the same capacity can have very different development costs.
The difference often comes from structural complexity.
A Simple Cylindrical Bottle
A conventional cylindrical body with a standard neck and lid may require relatively straightforward development.
A Custom-Shaped Bottle
A bottle with unusual geometry may require:
- More complex forming
- Additional tooling
- More structural review
- More prototype iterations
A Custom Neck
A unique mouth or thread design can affect both the bottle body and lid, increasing development requirements.
A Complex Lid
A multi-function lid with a straw, button, valve or locking mechanism may require several custom components and dedicated tooling.
Complex Internal Structures
Special internal structures can also increase testing requirements.
For this reason:
The more complex the internal structure, the more important it is to evaluate manufacturability before tooling.
Early structural review can help identify problems before they become expensive tooling changes.If you are also estimating the budget for a custom bottle project, see our guide to custom stainless steel water bottle costs.
12. Already Have a Bottle Drawing?
You don’t need to have a complete manufacturing specification before contacting a manufacturer.
If you already have a sketch, 2D drawing or 3D CAD file, an engineering team can review the design and help identify potential manufacturing issues before prototyping.You can learn more about our OEM & ODM water bottle manufacturing services here.
Not sure whether your idea can be made into a vacuum insulated bottle? That’s okay, too.
You can start with a simple sketch, reference image or product concept. The design can then be evaluated based on the required capacity, dimensions, internal structure, insulation performance and manufacturing feasibility.
The goal is not simply to reproduce a drawing.
It is to turn the concept into a vacuum insulated water bottle that can work reliably as a real product.If you already have a bottle concept or drawing, you can contact YEWAY to discuss the project.
The outside defines what the bottle looks like. The internal structure determines how the bottle works.